Hello fellow yarn lovers! Get ready to embrace the cozy vibes with a project that’s as delightful to make as it is to wear. Today, we’re diving into the wonderful world of the 3D Leaf Stitch, and I’m so excited to share some absolutely gorgeous free crochet beanie patterns featuring this unique texture!
Imagine a hat that’s not just warm, but also a little work of art. These beanies showcase the beautiful, raised texture of the 3D Leaf Stitch, creating a stunning, dimensional effect that’s both eye-catching and incredibly soft. They’re perfect for adding a touch of handmade charm to your fall and winter wardrobe, or for creating thoughtful, personalized gifts for friends and family. Don’t let the unique look fool you – this project is surprisingly beginner-friendly, and our accompanying video tutorial will guide you every stitch of the way. You’ll learn how to master the 3D Leaf Stitch, work in continuous rounds, and create a perfectly fitting beanie that you’ll be proud to show off!
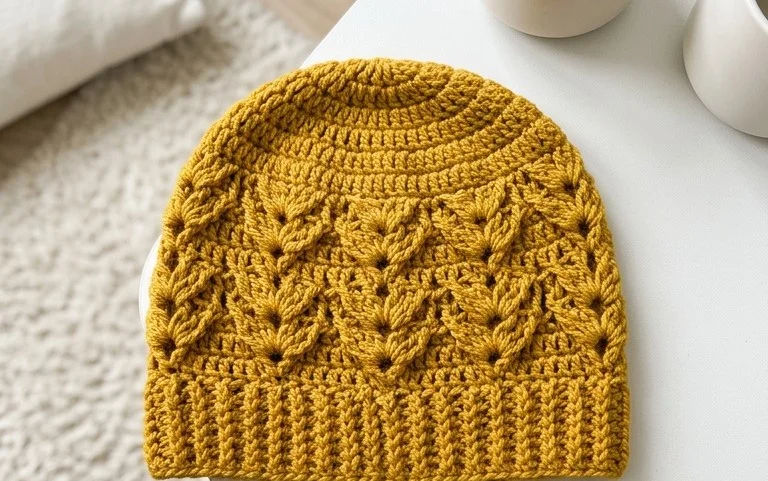
Unlock Your Inner Designer with the Crochet 3D Leaf Stitch Beanie Hat
There’s something truly magical about a handmade hat, isn’t there? It’s more than just a cozy accessory; it’s a wearable piece of art, crafted with your own two hands and infused with your unique style. If you’re a crochet enthusiast looking for your next captivating project, look no further than the 3D Leaf Stitch Beanie Hat. This pattern is an absolute gem, offering a beautiful texture and a delightful three-dimensional element that will make your hat stand out from the crowd. Get ready to create something truly special!
This article will guide you through everything you need to know to successfully crochet the 3D Leaf Stitch Beanie Hat. We’ll dive into yarn and hook recommendations, explore the intricate stitch techniques, offer valuable tips for beginners, and reveal how you can personalize this design to perfection. Plus, we’ll cover essential care instructions and spark your imagination with creative project ideas.
The Enchanting 3D Leaf Stitch: What Makes It So Special?
The star of this pattern is undoubtedly the 3D Leaf Stitch. This isn’t your average flat stitch; it creates raised, textured “leaves” that seem to pop right off the fabric. This creates a visually stunning and tactile experience that is both impressive and enjoyable to create. The beauty of this stitch lies in its ability to add depth and interest to a simple beanie, transforming it into a true statement piece. It’s the perfect way to elevate your crochet skills and create a hat that feels both sophisticated and whimsical.
Choosing Your Crafting Companions: Yarn and Hook Recommendations
The right yarn and hook are crucial for bringing any crochet pattern to life, and the 3D Leaf Stitch Beanie is no exception. To achieve that beautiful drape and stitch definition, we recommend a few key choices.
Yarn: For a hat that is both cozy and durable, a worsted weight yarn is an excellent choice. Look for fibers that have a good stitch definition, such as acrylics, wool blends, or even cotton blends. These fibers will allow the 3D Leaf Stitch to really shine.
Acrylic Yarns: These are budget-friendly, widely available, and come in an incredible array of colors. They are also generally machine washable, making them a practical choice for everyday wear.
Wool Blends: For extra warmth and a luxurious feel, consider a wool blend. These can offer beautiful drape and a natural elasticity that is perfect for hats.
Cotton Blends: If you’re looking for a hat for warmer weather or prefer a more breathable fabric, a cotton blend can be a great option. Just be aware that pure cotton can be a bit stiffer, so a blend often provides a better balance.
Hook Size: The hook size will largely depend on your yarn choice and your personal tension. However, for a worsted weight yarn, a common hook size to start with is US size H/8 (5.0 mm) or US size I/9 (5.5 mm). It’s always a good idea to check the yarn label for its recommended hook size and to create a small swatch to test your gauge. You want the stitches to be firm enough to hold the 3D texture but not so tight that the fabric becomes stiff.
Mastering the Magic: Essential Stitch Techniques
While the 3D Leaf Stitch might look complex, it’s built upon a foundation of fundamental crochet stitches that many crafters are already familiar with. Understanding these techniques will be your key to success.
Chain (ch): The starting point for most crochet projects, creating a foundation of loops.
Single Crochet (sc): A basic stitch that creates a dense and sturdy fabric.
Half Double Crochet (hdc): A stitch that is taller than a single crochet but shorter than a double crochet, offering a good balance of speed and texture.
Double Crochet (dc): A taller stitch that creates a more open and flexible fabric.
Front Post Double Crochet (fpdc): This is where the magic of the 3D element begins! You will crochet around the post of a stitch from the front, causing the stitch to pop forward.
Back Post Double Crochet (bpdc): The inverse of fpdc, crocheting around the post of a stitch from the back, which can help create definition or tuck stitches away.
Slip Stitch (sl st): Used for joining rounds or creating a smooth edge.
The 3D Leaf Stitch itself is often created by a combination of these stitches, strategically placed to form the “leaves.” The video tutorial that accompanies this pattern will be invaluable in demonstrating the precise execution of this special stitch, showing you how to create those beautiful raised elements. Don’t be afraid to pause, rewind, and rewatch those sections as many times as you need!
Embracing the Craft: Tips for Beginners
If you’re new to crochet or just dipping your toes into more intricate patterns, the 3D Leaf Stitch Beanie Hat is an achievable and rewarding project. Here are some tips to make your journey smoother:
Start with a Swatch: Before you begin your hat, make a small swatch of the 3D Leaf Stitch using your chosen yarn and hook. This will help you get a feel for the stitch, check your tension, and ensure you like the way the fabric looks and feels.
Follow the Video Tutorial Closely: The video is your best friend for this pattern. Pay close attention to the stitch explanations and demonstrations, especially for the 3D Leaf Stitch.
Don’t Be Afraid to Use Stitch Markers: Stitch markers are incredibly helpful for keeping track of your place, especially in rounds. They can mark the beginning of a round, important stitch placements, or tricky sections.
Learn to Read Your Stitches: As you work, practice identifying your stitches. This will make it easier to spot mistakes and know where to insert your hook.
Embrace Imperfection: Your first few attempts might not be perfect, and that’s completely okay! Every stitch is a learning opportunity. Enjoy the process and celebrate each small victory.
Take Breaks: Crochet is a wonderful way to relax, but it’s also important to take breaks to avoid hand or wrist fatigue. Step away, stretch, and come back with fresh eyes.
Your Personal Touch: Customizing Your Beanie
One of the greatest joys of crochet is the ability to personalize your creations. The 3D Leaf Stitch Beanie Hat offers ample opportunities for customization to make it truly your own.
Color Choices:
Solid Color: A single, beautiful color will allow the texture of the 3D Leaf Stitch to take center stage. Jewel tones, earthy neutrals, or vibrant brights can all look stunning.
Two-Tone: You could use one color for the main body of the hat and another for the brim or to highlight the leaf details.
Stripes: Experiment with different stripe widths and color combinations for a more playful look.
Gradient/Ombre Yarn: These yarns naturally transition through colors, creating a beautiful, effortless ombre effect that will make your leaves pop.
Size Adjustments:
Gauge is Key: The most important factor in achieving the correct size is your gauge (the number of stitches and rows per inch). Work your swatch and adjust your hook size if needed to match the pattern’s recommended gauge.
Adding/Subtracting Rounds: To adjust the height of the beanie, simply add or subtract rounds from the main body of the hat.
Brim Adjustments: The brim is usually worked separately or as part of the initial rounds. You can adjust its height by adding or subtracting rows or rounds of your chosen stitch.
Adding Embellishments:
Pom-Pom: A classic and fun addition! Choose a yarn that complements your beanie or go for a bold, contrasting color.
Buttons: Add decorative buttons to the brim for a touch of vintage charm.
Appliqués: Crochet small flowers, acorns, or other motifs to add to your hat.
Beads: Carefully stitch on beads to add a touch of sparkle and elegance.
Caring for Your Handcrafted Treasure
Your finished 3D Leaf Stitch Beanie Hat is a labor of love, and with a little care, it will last for many seasons to come.
Washing:
Hand Wash Preferred: For most yarns, especially wool or delicate blends, hand washing is the gentlest method. Use cool water and a mild detergent specifically designed for wool or delicates. Gently swish the hat in the water, avoiding wringing or stretching.
Machine Wash (if applicable): If you used a sturdy acrylic yarn, you might be able to machine wash it on a gentle cycle with cold water. Always place your hat in a mesh laundry bag to protect it.
Drying:
Reshape and Lay Flat: After washing, gently squeeze out excess water (do not wring). Reshape the hat to its original form and lay it flat on a clean towel. Flip it periodically to ensure even drying.
Avoid Hanging: Never hang a wet crochet item to dry, as the weight of the water can stretch and distort the stitches.
Avoid Direct Heat: Keep your hat away from direct sunlight or heat sources like radiators, as these can damage the fibers.
Storage: Store your hat in a cool, dry place. Fold it gently or store it on a shelf to prevent it from getting crushed. If storing for a long period, consider placing it in a breathable bag with a sachet of lavender or cedar to deter moths.
Beyond the Beanie: Project Ideas to Spark Your Creativity
While the 3D Leaf Stitch Beanie is a fantastic project on its own, this versatile stitch can be used for so much more! Once you’ve mastered it, consider applying it to these other wonderful ideas:
Scarves and Cowls: Imagine a chunky scarf or a cozy cowl with these raised leaves – perfect for adding texture to your winter wardrobe.
Mittens and Gloves: Create a matching set with mittens or gloves that feature the 3D Leaf Stitch on the back of the hand.
Dishcloths and Washcloths: The textured nature of the stitch makes it excellent for creating effective scrubbing cloths.
Coasters and Placemats: Add a touch of handmade charm to your dining table with coasters or placemats featuring this intricate stitch.
Tote Bags: Incorporate the 3D Leaf Stitch into the body of a tote bag for a unique and stylish accessory.
Home Decor Items: Think about small decorative pillows or even a textured throw blanket. The possibilities are truly endless!
The Crochet 3D Leaf Stitch Beanie Hat is more than just a pattern; it’s an invitation to explore your creativity, hone your skills, and create something truly beautiful and functional. With a little patience, the right materials, and the guidance of the video tutorial, you’ll be well on your way to crafting a hat you’ll be proud to wear and share. Happy crocheting!
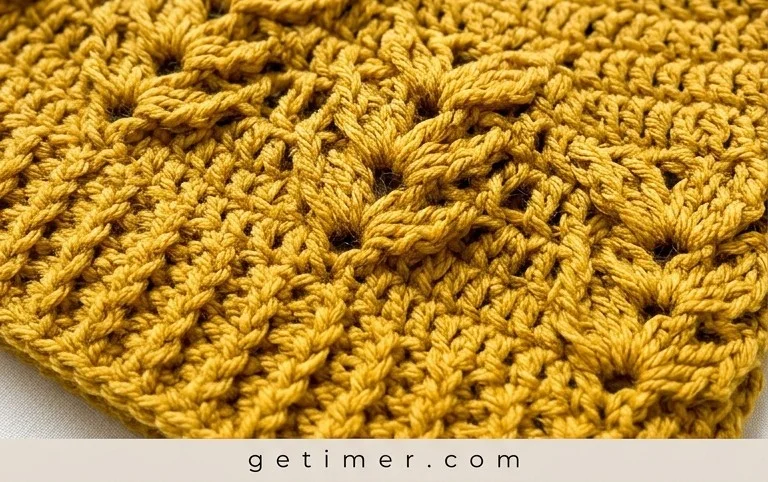
There you have it – a delightful crochet pattern for a 3D Leaf Stitch Beanie that’s as beautiful as it is cozy! I truly hope this pattern inspires you to grab your hook and yarn and bring this gorgeous hat to life. Don’t be shy about sharing your finished creations on social media! Tag us and use #3DLeafBeanie so we can all admire your handiwork. Feel free to experiment with different yarn weights or colors for unique variations. And as always, we have plenty more exciting crochet patterns waiting for you to discover!